Bootstrap4 菜鸟教程
- Bootstrap4 教程
- Bootstrap4 安装使用
- Bootstrap4 网格系统
- Bootstrap4 文字排版
- Bootstrap4 颜色
- Bootstrap4 表格
- Bootstrap4 图像形状
- Bootstrap4 Jumbotron
- Bootstrap4 信息提示框
- Bootstrap4 按钮
- Bootstrap4 按钮组
- Bootstrap4 徽章
- Bootstrap4 进度条
- Bootstrap4 分页
- Bootstrap4 列表组
- Bootstrap4 卡片
- Bootstrap4 下拉菜单
- Bootstrap4 折叠
- Bootstrap4 导航
- Bootstrap4 导航栏
- Bootstrap4 面包屑导航
- Bootstrap4 表单
- Bootstrap4 表单控件
- Bootstrap4 输入框组
- Bootstrap4 自定义表单
- Bootstrap4 轮播
- Bootstrap4 模态框
- Bootstrap4 提示框
- Bootstrap4 弹出框
- Bootstrap4 滚动监听
- Bootstrap4 小工具
- Bootstrap4 Flex 布局
- Bootstrap4 多媒体对象
Bootstrap4 自定义表单
Bootstrap4 可以自定义一些表单的样式来替换浏览器默认的样式。
自定义复选框
如果要自定义一个复选框,可以设置 <div> 为父元素,类为 .custom-control 和 .custom-checkbox,复选框作为子元素放在该 <div> 里头,然后复选框设置为 type="checkbox",类为 .custom-control-input。
复选框的文本使用 label 标签,标签使用 .custom-control-label 类,label 的 for 属性值需要匹配复选框的 id。
<!DOCTYPE html> <html> <head> <title>Bootstrap 示例</title> <meta charset="utf-8"> <meta name="viewport" content="width=device-width, initial-scale=1"> <link rel="stylesheet" href="https://cdn.staticfile.org/twitter-bootstrap/4.3.1/css/bootstrap.min.css"> <script src="https://cdn.staticfile.org/jquery/3.2.1/jquery.min.js"></script> <script src="https://cdn.staticfile.org/popper.js/1.15.0/umd/popper.min.js"></script> <script src="https://cdn.staticfile.org/twitter-bootstrap/4.3.1/js/bootstrap.min.js"></script> </head> <body> <div class="container mt-3"> <h2>自定义复选框</h2> <p>如果要自定义一个复选框,可以设置 <div> 为父元素,类为 .custom-control 和 .custom-checkbox,复选框作为子元素放在该 <div> 里头,然后复选框设置为 type="checkbox",类为 .custom-control-input。</p> <p>复选框的文本使用 label 标签,标签使用 .custom-control-label 类,label 的 for 属性值需要匹配复选框的 id。</p> <form action="/action_page.php"> <div class="custom-control custom-checkbox mb-3"> <input type="checkbox" class="custom-control-input" id="customCheck" name="example1"> <label class="custom-control-label" for="customCheck">自定义复选框</label> </div> <input type="checkbox" id="defaultCheck" name="example2"> <label for="defaultCheck">默认复选框</label> <br> <button type="submit" class="btn btn-primary">提交</button> </form> </div> </body> </html>测试看看 ‹/›
运行后效果如下:

自定义单选框
如果要自定义一个单选框,可以设置 <div> 为父元素,类为 .custom-control 和 .custom-radio,单选框作为子元素放在该 <div> 里头,然后单选框设置为 type="radio",类为 .custom-control-input。
单选框的文本使用 label 标签,标签使用 .custom-control-label 类,label 的 for 属性值需要匹配单选框的 id。
<!DOCTYPE html>
<html>
<head>
  <title>Bootstrap 示例</title>
  <meta charset="utf-8">
  <meta name="viewport" content="width=device-width, initial-scale=1">
  <link rel="stylesheet" href="https://cdn.staticfile.org/twitter-bootstrap/4.3.1/css/bootstrap.min.css">
  <script src="https://cdn.staticfile.org/jquery/3.2.1/jquery.min.js"></script>
  <script src="https://cdn.staticfile.org/popper.js/1.15.0/umd/popper.min.js"></script>
  <script src="https://cdn.staticfile.org/twitter-bootstrap/4.3.1/js/bootstrap.min.js"></script>
</head>
<body>
<div class="container mt-3">
  <h2>自定义单选框</h2>
  <p>如果要自定义一个单选框,可以设置 div 为父元素,类为 .custom-control 和 .custom-radio,复选框作为子元素放在该 div 里头,然后单选框设置为 type="radio",类为 .custom-control-input。</p>
  <p>单选框的文本使用 label 标签,标签使用 .custom-control-label 类,label 的 for 属性值需要匹配单选框的 id。</p>
  <form action="/action_page.php">
    <div class="custom-control custom-radio">
      <input type="radio" class="custom-control-input" id="customRadio" name="example1">
      <label class="custom-control-label" for="customRadio">自定义单选框</label>
    </div>
    <input type="radio" id="defaultRadio" name="example2">
    <label for="defaultRadio">默认单选框</label>
    <br>
    <button type="submit" class="btn btn-primary">提交</button>
  </form>
</div>
</body>
</html>
测试看看 ‹/›
运行后效果如下:

自定义控件显示在同一行
我们可以在外部元素上使用 .custom-control-inline 类来包裹自定义表单控件,这样自定义表单控件就能显示在同一行:
<!DOCTYPE html>
<html>
<head>
  <title>Bootstrap 示例</title>
  <meta charset="utf-8">
  <meta name="viewport" content="width=device-width, initial-scale=1">
  <link rel="stylesheet" href="https://cdn.staticfile.org/twitter-bootstrap/4.3.1/css/bootstrap.min.css">
  <script src="https://cdn.staticfile.org/jquery/3.2.1/jquery.min.js"></script>
  <script src="https://cdn.staticfile.org/popper.js/1.15.0/umd/popper.min.js"></script>
  <script src="https://cdn.staticfile.org/twitter-bootstrap/4.3.1/js/bootstrap.min.js"></script>
</head>
<body>
<div class="container mt-3">
  <h2>自定义控件显示在同一行</h2>
  <p>我们可以在外部元素上使用 .custom-control-inline 类来包裹自定义表单控件,这样自定义表单控件就能显示在同一行:</p>
  <form action="/action_page.php">
    <div class="custom-control custom-radio custom-control-inline">
      <input type="radio" class="custom-control-input" id="customRadio1" name="example1">
      <label class="custom-control-label" for="customRadio1">自定义单选框 1</label>
    </div>
    <div class="custom-control custom-radio custom-control-inline">
      <input type="radio" class="custom-control-input" id="customRadio2" name="example2">
      <label class="custom-control-label" for="customRadio2">自定义单选框 2</label>
    </div>
    <button type="submit" class="btn btn-primary">提交</button>
  </form>
</div>
</body>
</html>
测试看看 ‹/›
运行后效果如下:

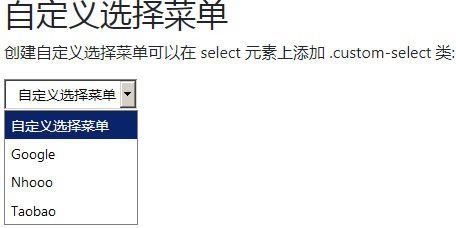
自定义选择菜单
创建自定义选择菜单可以在 <select> 元素上添加 .custom-select 类:
<!DOCTYPE html>
<html>
<head>
  <title>Bootstrap 示例</title>
  <meta charset="utf-8">
  <meta name="viewport" content="width=device-width, initial-scale=1">
  <link rel="stylesheet" href="https://cdn.staticfile.org/twitter-bootstrap/4.3.1/css/bootstrap.min.css">
  <script src="https://cdn.staticfile.org/jquery/3.2.1/jquery.min.js"></script>
  <script src="https://cdn.staticfile.org/popper.js/1.15.0/umd/popper.min.js"></script>
  <script src="https://cdn.staticfile.org/twitter-bootstrap/4.3.1/js/bootstrap.min.js"></script>
</head>
<body>
<div class="container mt-3">
  <h2>自定义选择菜单</h2>
  <p>创建自定义选择菜单可以在 select 元素上添加 .custom-select 类:</p>
  <form>
  <select name="cars" class="custom-select-sm">
    <option selected>自定义选择菜单</option>
    <option value="Google">Google</option>
    <option value="Nhooo">Nhooo</option>
    <option value="Taobao">Taobao</option>
  </select>
 </form>
</div>
</body>
</html>
测试看看 ‹/›
运行后效果如下:
如果我们要设置自定义选择菜单大小,可以使用 .custom-select-sm、.custom-select-lg 来设置它们的大小:
<!DOCTYPE html>
<html>
<head>
  <title>Bootstrap 示例</title>
  <meta charset="utf-8">
  <meta name="viewport" content="width=device-width, initial-scale=1">
  <link rel="stylesheet" href="https://cdn.staticfile.org/twitter-bootstrap/4.3.1/css/bootstrap.min.css">
  <script src="https://cdn.staticfile.org/jquery/3.2.1/jquery.min.js"></script>
  <script src="https://cdn.staticfile.org/popper.js/1.15.0/umd/popper.min.js"></script>
  <script src="https://cdn.staticfile.org/twitter-bootstrap/4.3.1/js/bootstrap.min.js"></script>
</head>
<body>
<div class="container mt-3">
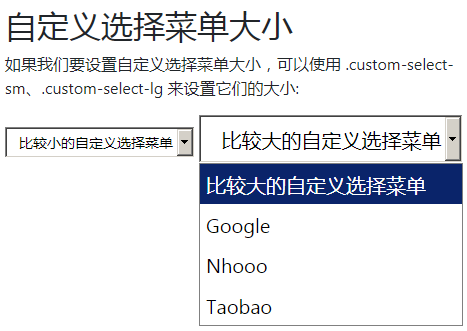
  <h2>自定义选择菜单大小</h2>
  <p>如果我们要设置自定义选择菜单大小,可以使用 .custom-select-sm、.custom-select-lg 来设置它们的大小:</p>
  <form>
    <!-- 小 -->
    <select name="cars" class="custom-select-sm">
      <option selected>比较小的自定义选择菜单</option>
      <option value="Google">Google</option>
      <option value="Nhooo">Nhooo</option>
      <option value="Taobao">Taobao</option>
    </select>

    <!-- 大 -->
    <select name="cars" class="custom-select-lg">
      <option selected>比较大的自定义选择菜单</option>
      <option value="Google">Google</option>
      <option value="Nhooo">Nhooo</option>
      <option value="Taobao">Taobao</option>
    </select>
  </form>
</div>
</body>
</html>
测试看看 ‹/›
运行后效果如下:
自定义滑块控件
我们可以在 input 为 type="range" 的输入框中添加 .custom-range 类来设置自定义滑块控件:
<!DOCTYPE html>
<html>
<head>
  <title>Bootstrap 示例</title>
  <meta charset="utf-8">
  <meta name="viewport" content="width=device-width, initial-scale=1">
  <link rel="stylesheet" href="https://cdn.staticfile.org/twitter-bootstrap/4.3.1/css/bootstrap.min.css">
  <script src="https://cdn.staticfile.org/jquery/3.2.1/jquery.min.js"></script>
  <script src="https://cdn.staticfile.org/popper.js/1.15.0/umd/popper.min.js"></script>
  <script src="https://cdn.staticfile.org/twitter-bootstrap/4.3.1/js/bootstrap.min.js"></script>
</head>
<body>
<div class="container mt-3">
  <h2>自定义滑块控件</h2>
  <p>我们可以在 input 为 type="range" 的输入框中添加 .custom-range 类来设置自定义滑块控件:</p>
  <form action="/action_page.php">
    <label for="customRange">自定义滑块控件</label>
    <input type="range" class="custom-range" id="customRange" name="points1">
    <label for="defaultRange">默认滑块控件</label>
    <input type="range" id="defaultRange" name="points2">
    <p><button type="submit" class="btn btn-primary">提交</button></p>
  </form>
</div>
</body>
</html>
测试看看 ‹/›
运行后效果如下:

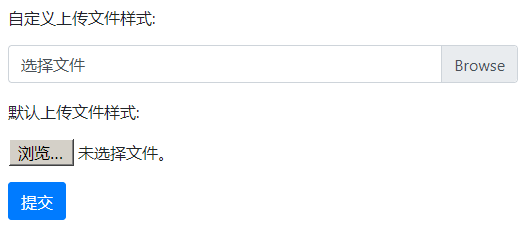
自定义文件上传控件
我们可以在父元素添加 .custom-file 类,然后在 input 设置为 type="file" 并添加 .custom-file-input:
上传控件的文本使用 label 标签,标签使用 .custom-file-label 类,label 的 for 属性值需要匹配上传控件 id。
<!DOCTYPE html>
<html>
<head>
  <title>Bootstrap 示例</title>
  <meta charset="utf-8">
  <meta name="viewport" content="width=device-width, initial-scale=1">
  <link rel="stylesheet" href="https://cdn.staticfile.org/twitter-bootstrap/4.3.1/css/bootstrap.min.css">
  <script src="https://cdn.staticfile.org/jquery/3.2.1/jquery.min.js"></script>
  <script src="https://cdn.staticfile.org/popper.js/1.15.0/umd/popper.min.js"></script>
  <script src="https://cdn.staticfile.org/twitter-bootstrap/4.3.1/js/bootstrap.min.js"></script>
</head>
<body>
<div class="container mt-3">
  <h2>自定义文件上传控件</h2>
  <p>我们可以在父元素添加 .custom-file 类,然后在 input 设置为 type="file" 并添加 .custom-control-label:</p>
  <form action="/action_page.php">
    <p>自定义上传文件样式:</p>
    <div class="custom-file mb-3">
      <input type="file" class="custom-file-input" id="customFile" name="filename">
      <label class="custom-file-label" for="customFile">选择文件</label>
    </div>

    <p>默认上传文件样式:</p>
    <input type="file" id="myFile" name="filename2">

    <div class="mt-3">
      <button type="submit" class="btn btn-primary">提交</button>
    </div>
  </form>
</div>
</body>
</html>
测试看看 ‹/›
运行后效果如下:
